
In my last post, I talked about a typical day in the life of a plumber. In our next plumber story, today’s quoted job is the replacement of an existing sump pump that works intermittently.
Your truck is loaded with all the needed material for the job. Your tools are ready, and power tools are charged. Gone are the days of corded power tools. No more finding outlets and running power cords to the work area. As a bonus, new power tools are lighter, smaller, and easier to get into tight spaces. With your tools and parts in tow, off to the front door.
Being a good plumber, you have already put down drop cloths and runners leading from the front door to the work area. Customers love this and it saves you from cleaning boot marks off the wood floors and carpeting. Once in the door boot covers go on, yes overkill, but it’s better to be safe than sorry. Now to the work area.
Familiarize yourself with the work area and scope of work as you lay out your tools and parts. Recheck your ideas on how the job is going to go.
With the replacement of the sump pump, does the drain line that you are working on look to be in good shape? Follow the drain to where it exits the home and check to see if it looks to be in good condition and supported correctly.
Prepping the new sump pump is a good habit to get into. After unboxing, take a picture or write down the model and serial numbers, putting these on the invoice during billing is good for you and the owner. That way if any questions or problems arise in the future you will know exactly what was installed and when.
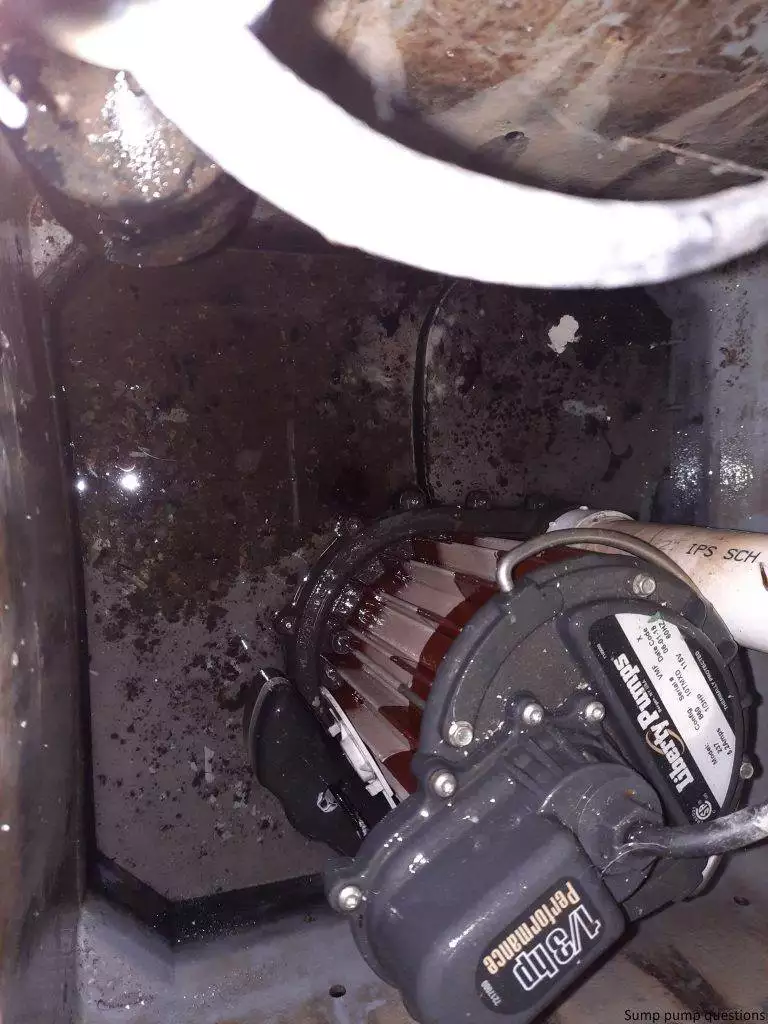
Next, measure the crock depth for correct check valve placement. Cut the needed 1 ½” PVC Sch. 40 pipe to length and prime both ends. Prime and then glue the male terminal adapter to the cut piece of PVC pipe. At this point drill your 1/8” vent hole just above the glued terminal adaptor. This vent hole is needed per most manufacturers’ instructions. Don’t forget to do this simple step. Not doing it could cause the pump to not work correctly thus increasing the possibility of a flood!
Since we are using a socket end 1 ½” PVC check valve, prime and glue the check valve with the arrow pointing up onto the other end of the cut PVC pipe, and with the male terminal adapter on the other end. This male adaptor can now be threaded into the new sump pump discharge adaptor.
Once the existing pump is removed this new pump is ready to be set in place. Before unplugging the existing pump, cycle it through another discharge, this clears all the water out of the crock. Take a minute and watch the incoming water flowing into the crock. Now, you know how much time you will have to remove the old pump and install the new pump. You don’t want to be working underwater installing the new pump, but there are times when this can’t be avoided. Some crocks have almost no water flowing into them, other crocks fill as fast as they empty, these are always fun! Luckily this crock is filling slowly.
Now you can unplug the old pump. With the existing drain piping being Sch.40 PVC, cutting the pipe where needed is done quickly with your cordless saw. Slowly pull the old pump out allowing it to drain the excess water back into the crock. Once done draining, put the pump in the garbage bag you have ready. This will make it safe to carry through the home to your truck. Set that to the side and inspect the bottom of the sump crock. Remove any debris, like stones, building waste, or the usual Ping-Pong and tennis balls. Kids’ toys and dog toys come in at a close second.
Now that the crock is clear the new sump pump can be set in place. With the discharge line already connected to the pump, it will be easy to line up with the existing discharge line. Measure the distance from the new check valve to the end of the existing pipe. In this case, it is a straight line between the two of them. Using a 1 ½” PVC coupling that has been primed, glue that to the existing line that has already been primed. Once the glue has set (about a minute), glue that same line to the new check valve hub that had been primed. Hold these together for a minute for good bonding.
This new sump pump is centered in the existing crock. To keep the pump from shifting when it turns on and off, it needs to be secured. There are many ways to secure the discharge line, in this case, using a piece of threaded rod is the best option. Cut a length of 3/8” rod measured from the edge of the PVC pipe to the cement block wall. Using a 1 ½” split ring pipe clamp with a 3/8” adaptor on the pipe, attach it about a foot above floor level on the pipe. Then take a 3/8” split ring mounting base and mark it on the wall level with the split ring. These bases can be attached with several different types of anchors. I prefer using 1 ½” Tapcon screws. Once the base is marked on the wall, drill your 1/8” pilot holes, and then mount the base with the Tapcon screws. This gives a nice secure mount that can be removed easily if needed. Install the threaded rod starting at the wall and then to the split ring (it will need to be removed from the pipe). Once attached, the split ring can be mounted onto the discharge pipe and tightened. Most times 3/8” nuts are installed at the base and ring on the threaded rod for added security.
By now, the glue fittings are dry (15 minutes minimum) for the pump to be tested. Plug the new pump into the GFCI (ground fault circuit interrupter) plug. If the crock water level is too low, you will need to fill it so the pump will cycle. Let the pump cycle at least two times and then check all fittings for leaks. When the pump is running you will notice that the vent hole that was installed is spraying water, this is normal and expected. If all looks well the cover can be installed on the sump crock. All sump crocks should be covered in some way. This keeps unwanted debris from entering the crock and the pump working correctly.
Clean the work area up, and remove all of your tools and fittings. Once this is done, bring the owner to the crock and explain what has been done and if possible, show them how the new pump runs. Now it’s time for more paperwork and then off to the next job!
If you would like plumbing advice or assistance first without the heavy expense of a professional plumber visit, contact me today!
Enjoy the day!!

- How To Make the Call: DIY Plumbing vs. Hiring a Professional - April 9, 2024
- How to Get Online Plumbing Advice: A Step-by-Step Guide - March 14, 2024
- Virtual Plumbing Solutions: Comparing JustAnswer.com - February 19, 2024
0 Comments